How to Create a Gallery Wall that Tells a Story Using Meaningful Indoor Decor Pieces
Introduction
A gallery wall is more than just a collection of pictures; it’s a visual narrative, a curated collection of memories and passions displayed for all to see. By choosing meaningful indoor decor pieces, you can craft a gallery wall that tells a unique story about who you are, what you love, and where you’ve been. This guide will walk you through the steps of creating a personalized and compelling gallery wall that resonates with you and your guests.
Planning Your Story-Driven Gallery Wall
Defining Your Narrative
Before hammering a single nail, consider the story you want to tell. Ask yourself:
- What are your passions and hobbies?
- What are some significant moments in your life?
- What places are meaningful to you?
- What aesthetic do you prefer: modern, vintage, eclectic, minimalist?
Answering these questions will help you identify the themes and elements that will make your gallery wall truly personal.
Choosing Your Wall
Select a wall that’s suitable in size and location. Consider:
- Size: The wall should be large enough to accommodate your desired arrangement without feeling cramped.
- Lighting: Natural or artificial light will influence how your pieces are perceived.
- Background: A neutral wall color provides a versatile backdrop, while a colored wall can add depth and personality.
- Traffic: A hallway or living room wall often makes a great choice, allowing you to share your story with guests.
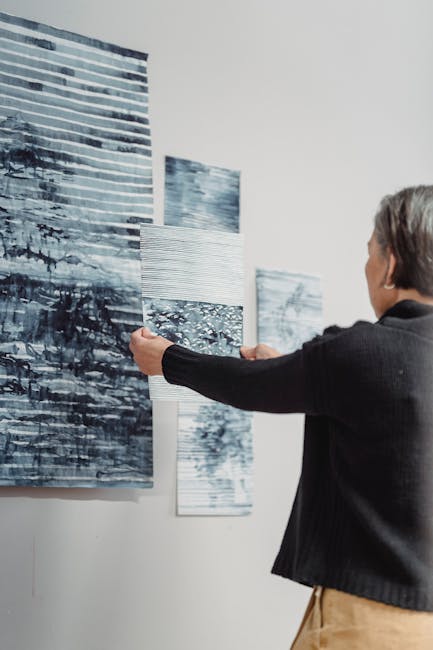
Gathering Meaningful Pieces
The heart of your story lies in the items you choose to display. Look beyond generic prints and consider:
- Photographs: Family photos, travel snapshots, portraits of loved ones – capture significant moments.
- Artwork: Paintings, prints, drawings, and sculptures that resonate with your personal taste or represent meaningful themes.
- Textiles: Vintage scarves, embroidered pieces, woven tapestries can add texture and visual interest.
- Memorabilia: Tickets from a memorable concert, postcards from a favorite destination, maps, or other keepsakes.
- Small Objects: Vintage keys, decorative plates, dried flowers, or miniature sculptures.
Don’t be afraid to mix and match different styles, textures, and sizes. The key is to choose items that hold personal significance.
Designing Your Gallery Wall Layout
Creating a Visual Mockup
Before you start hanging anything, experiment with different layouts. Here are a few options:
- Lay it out on the floor: Arrange your pieces on the floor in the same dimensions as your wall. This allows you to easily rearrange and experiment with different configurations.
- Use paper templates: Trace each piece onto paper and cut out the shapes. Tape these templates to the wall to visualize the layout before committing to holes.
- Digital Mockup: Take a photo of your wall and use a photo editing app to digitally place your pieces on the wall.
Choosing a Layout Style
- Symmetrical: A balanced and formal arrangement with evenly spaced pieces.
- Asymmetrical: A more casual and dynamic arrangement with varied spacing and sizes.
- Grid: A structured layout with pieces arranged in rows and columns.
- Organic: A free-flowing and unstructured arrangement that feels natural and intuitive.
Consider the overall aesthetic of your room and choose a layout that complements it.
Spacing and Alignment
Consistency is key to a visually appealing gallery wall:
- Spacing: Maintain consistent spacing between pieces (typically 2-4 inches).
- Alignment: Align the tops, bottoms, or centers of the pieces to create a sense of order.
- Visual Weight: Distribute pieces with similar visual weight (size, color, texture) evenly throughout the arrangement.
Hanging Your Gallery Wall
Gathering Your Tools
Make sure you have the right tools for the job:
- Level
- Measuring tape
- Pencil
- Hammer or drill
- Nails, screws, or picture hanging strips (depending on the weight of your pieces)
- Picture hanging wire or D-rings (if needed)
Marking and Hanging
- Measure and mark: Use your paper templates or mockup to mark the location of each nail or screw on the wall.
- Use a level: Ensure that each piece is hung straight.
- Start with the largest piece: This will anchor the arrangement and make it easier to position the other pieces around it.
- Step back and assess: Take a step back to view your progress and make any necessary adjustments.
Adding the Finishing Touches
Consider a Focal Point
Choose one piece that will serve as the central focus of your gallery wall. This could be the largest piece, the most visually striking piece, or the piece that holds the most personal significance.
Incorporating Texture and Depth
Add dimension to your gallery wall by incorporating pieces with different textures and depths. Consider using:
- Framed mirrors
- Shadow boxes
- Floating shelves
Personal Touches
Don’t be afraid to add small personal touches that further enhance the story you’re telling. This could include:
- Handwritten notes
- Small trinkets or souvenirs
- Quotes or sayings that inspire you
Conclusion
Creating a gallery wall is a journey of self-expression. By carefully selecting meaningful indoor decor pieces and arranging them in a thoughtful way, you can create a visual narrative that tells a story about your life, your passions, and your unique personality. Embrace the process, experiment with different layouts, and don’t be afraid to break the rules. The most important thing is to create a gallery wall that you love and that reflects who you are.


Post Comment